Preparation Service Equipment Energy Saving Lamp:


Compact fluorescent light bulbs with fluorescent light that has been modified more than the price of Energy Saving Lamp .
May be useful.
- Minus screwdriver: for prying the lamp casing
- Solder.
- Tin / tenol
- Multitester / AVO Meter
- Cables to taste.
Method of Energy Saving Lamps Service:
- Casing Open Energy Saving Lamp with mencongkelnya using a screwdriver.
- Neon separated from the circuit, then test using fluorescent multitester. There are two poles in neon, measured respectively by using OHM meter measuring limit x1. If neon is still good then respectively when measured will show a number of around 2-8 ohms. If one pole / end there is a broken / not show the number it means that neon is damaged / broken. How to outsmart if neon is broken please read at the bottom.
- If neon is good, meaning the damage is in the circuit.
Here are some of the components in a series of energy saving lamps that need to be checked and replaced if damaged:
- Filter after the diode bridge, usually swell, replace with 10uF elco / 350-400 volts
- Resistors from 2.2 to 10 ohm 2 pieces (which is connected to the foot of the transistor emitter)
- Resistor 15-20 ohm 2 pieces (which is connected to the transistor base)
- MJE 13003 transistor type: 2 pieces
- When all the components is good and the lights still off, replace it tantalum capacitor 3.9 nF - 4nF/1200volt, although looks are not damaged. condenser serves as a light starter. Condenser is directly connected to one pole of neon.
If neon is broken, and a series of Energy Saving Lamp is still OK following trick:
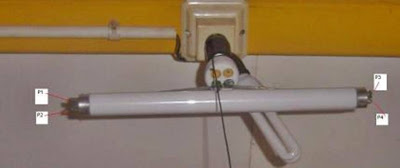
- Prepare regular Neon 10-15 watt Philips brand (price 6-8 rb) for replacement of damaged neon.
- Connect the two poles of neon with the circuit according to the image below.
Compact fluorescent light bulbs with fluorescent light that has been modified more than the price of Energy Saving Lamp .
May be useful.